设计模式
几种设计模式的实现
参考https://refactoringguru.cn/design-patterns/catalog
抽象工厂模式结构
抽象产品 (Abstract Product) 为构成系列产品的一组不同但相关的产品声明接口。
具体产品 (Concrete Product) 是抽象产品的多种不同类型实现。 所有变体 (维多利亚/现代) 都必须实现相应的抽象产品 (椅子/沙发)。
抽象工厂 (Abstract Factory) 接口声明了一组创建各种抽象产品的方法。
具体工厂 (Concrete Factory) 实现抽象工厂的构建方法。 每个具体工厂都对应特定产品变体, 且仅创建此种产品变体。
尽管具体工厂会对具体产品进行初始化, 其构建方法签名必须返回相应的抽象产品。 这样, 使用工厂类的客户端代码就不会与工厂创建的特定产品变体耦合。 客户端 (Client) 只需通过抽象接口调用工厂和产品对象, 就能与任何具体工厂/产品变体交互。
1
2
3
4
5
6
7
8
9
10
11
12
13
14
15
16
17
18
19
20
21
22
23
24
25
26
27
28
29
30
31
32
33
34
35
36
37
38
39
40
41
42
43
44
45
46
47
48
49
50
51
52
53
54
55
56
57
58
59
60
61
62
63
64
65
66
67
68
69
70
71
72
73
74
75
76
77
78
79
80
81
	export class Factory
	{
	public:
		Factory() = default;
		virtual ~Factory() = 0;
		virtual ProductA* CreateProductA() = 0;
		virtual ProductB* CreateProductB() = 0;
	};

	export class ConcreteFactory1 : public Factory
	{
	public:
		ConcreteFactory1() = default;
		virtual ~ConcreteFactory1() = default;
		ProductA* CreateProductA()
		{
			return new ProductA(1);
		}
		ProductB* CreateProductB()
		{
			return new ProductB(1);
		}
	};

	export class ConcreteFactory2 : public Factory
	{
	public:
		ConcreteFactory2() = default;
		virtual ~ConcreteFactory2() = default;
		ProductA* CreateProductA()
		{
			return new ProductA(2);
		}
		ProductB* CreateProductB()
		{
			return new ProductB(2);
		}
	};

	export class Product
	{
	public:
		virtual void function1() = 0;
		virtual void function2() = 0;
	};

	export class ProductA : public Product
	{
		int type;
	public:
		ProductA(int type)
		{
			this->type = type;
		}
		void function1() override
		{
			cout << "ProductA function1 , Type " << type << endl;
		}
		void function2() override
		{
			cout << "ProductA function2 , Type " << type << endl;
		}
	};

	export class ProductB : public Product
	{
		int type;
	public:
		ProductB(int type)
		{
			this->type = type;
		}
		void function1() override
		{
			cout << "ProductB function1 , Type " << type << endl;
		}
		void function2() override
		{
			cout << "ProductB function2 , Type " << type << endl;
		}
	};
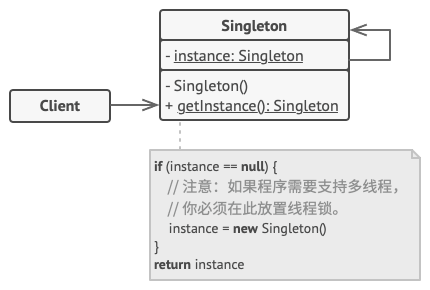
单例模式结构
单例 (Singleton) 类声明了一个名为
getInstance获取实例的静态方法来返回其所属类的一个相同实例。单例的构造函数必须对客户端 (Client) 代码隐藏。 调用
获取实例方法必须是获取单例对象的唯一方式。
1
2
3
4
5
6
7
8
9
10
11
12
13
14
15
16
17
18
19
20
21
	export class Singleton
	{
	protected:
		static Singleton* instance;
		Singleton() = default;
	public:
		//复制构造函数
		Singleton(const Singleton& other) = delete;
		//赋值操作符
		Singleton& operator=(const Singleton& other) = delete;

		static Singleton* GetInstance()
		{
			if (!instance)
			{
				instance = new Singleton;
			}
			return instance;
		}
	};
	Singleton* Singleton::instance = nullptr;
适配器模式结构
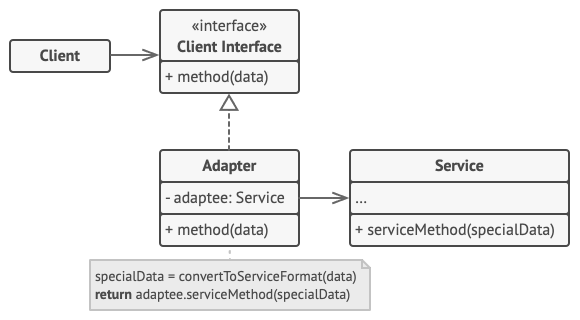
对象适配器
实现时使用了构成原则: 适配器实现了其中一个对象的接口, 并对另一个对象进行封装。 所有流行的编程语言都可以实现适配器。
- 客户端 (Client) 是包含当前程序业务逻辑的类。
- 客户端接口 (Client Interface) 描述了其他类与客户端代码合作时必须遵循的协议。
- 服务 (Service) 中有一些功能类 (通常来自第三方或遗留系统)。 客户端与其接口不兼容, 因此无法直接调用其功能。
- 适配器 (Adapter) 是一个可以同时与客户端和服务交互的类: 它在实现客户端接口的同时封装了服务对象。 适配器接受客户端通过适配器接口发起的调用, 并将其转换为适用于被封装服务对象的调用。
- 客户端代码只需通过接口与适配器交互即可, 无需与具体的适配器类耦合。 因此, 你可以向程序中添加新类型的适配器而无需修改已有代码。 这在服务类的接口被更改或替换时很有用: 你无需修改客户端代码就可以创建新的适配器类。
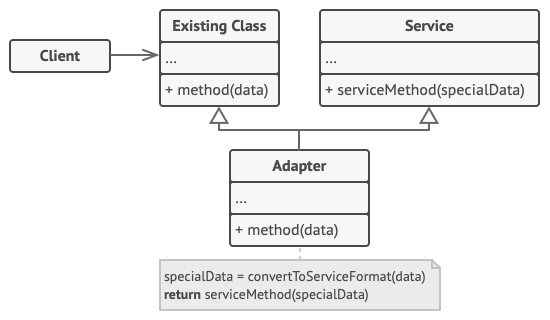
类适配器
这一实现使用了继承机制: 适配器同时继承两个对象的接口。 请注意, 这种方式仅能在支持多重继承的编程语言中实现, 例如 C++。
- 类适配器不需要封装任何对象, 因为它同时继承了客户端和服务的行为。 适配功能在重写的方法中完成。 最后生成的适配器可替代已有的客户端类进行使用。
1
2
3
4
5
6
7
8
9
10
11
12
13
14
15
16
17
18
19
20
21
22
23
24
25
26
27
28
29
30
31
32
33
34
35
36
37
38
39
40
41
42
43
44
45
46
47
48
49
50
51
52
53
54
55
56
57
	export typedef int SpecialData;
	export typedef float OtherData;

	export class OriginalClass
	{
	public:
		virtual SpecialData method()
		{
			std::cout << "OriginalClass::method()" << std::endl;
			return SpecialData();
		}
	};

	export class RequiredClass
	{
	public:
		OtherData otherMethod()
		{
			std::cout << "RequiredClass::otherMethod()" << std::endl;
			return OtherData();
		}
	};

	export class Service
	{
	public:
		void serviceMethod(SpecialData input)
		{
			std::cout << "Service::Data inputed" << std::endl;
		}
	};

	export class ObjectAdapter : public OriginalClass
	{
		RequiredClass* instance;
	public:
		ObjectAdapter(RequiredClass& re)
		{
			this->instance = &re;
		}
		SpecialData method()
		{
			std::cout<<"ObjectAdapter::method()"<<std::endl;
			return (SpecialData)instance->otherMethod();
		}
	};

	export class ClassAdapter :public RequiredClass, Service
	{
	public:
		void method()
		{
			std::cout<<"ClassAdapter::method()"<<std::endl;
			auto temp = (SpecialData)otherMethod();
			serviceMethod(temp);
		}
	};
桥接模式结构
抽象部分 (Abstraction) 提供高层控制逻辑, 依赖于完成底层实际工作的实现对象。
实现部分 (Implementation) 为所有具体实现声明通用接口。 抽象部分仅能通过在这里声明的方法与实现对象交互。
抽象部分可以列出和实现部分一样的方法, 但是抽象部分通常声明一些复杂行为, 这些行为依赖于多种由实现部分声明的原语操作。
具体实现 (Concrete Implementations) 中包括特定于平台的代码。
精确抽象 (Refined Abstraction) 提供控制逻辑的变体。 与其父类一样, 它们通过通用实现接口与不同的实现进行交互。
通常情况下, 客户端 (Client) 仅关心如何与抽象部分合作。 但是, 客户端需要将抽象对象与一个实现对象连接起来。
1
2
3
4
5
6
7
8
9
10
11
12
13
14
15
16
17
18
19
20
21
22
23
24
25
26
27
28
29
30
31
32
33
34
35
36
37
38
39
40
41
42
43
44
45
46
47
48
49
50
51
52
53
54
55
56
57
58
59
	export class Implementation
	{
	public:
		virtual std::string Operation()
		{
			std::cout << "Implementation" << std::endl;
			return "Implementation";
		}
	};

	//具体实现
	class ConcreteImplementationA : public Implementation
	{
	public:
		std::string Operation() override
		{
			return "ConcreteImplementationA: Here's the result on the platform A.\n";
		}
	};
	class ConcreteImplementationB : public Implementation
	{
	public:
		std::string Operation() override
		{
			return "ConcreteImplementationB: Here's the result on the platform B.\n";
		}
	};

	//抽象层
	class Abstraction
	{
	protected:
		Implementation* imp;
	public:
		Abstraction(Implementation* implementation) :
			imp(implementation)
		{}
		virtual ~Abstraction()
		{
			delete imp;
		}
		virtual std::string Operation()
		{
			return imp->Operation();
		}
	};

	class ExtendedAbstraction : public Abstraction
	{
	public:
		ExtendedAbstraction(Implementation* implementation) :Abstraction(implementation)
		{

		}
		virtual std::string Operation() override
		{
			return "ExtendedAbstraction: " + imp->Operation();
		}
	};
组合模式结构
组件 (Component) 接口描述了树中简单项目和复杂项目所共有的操作。
叶节点 (Leaf) 是树的基本结构, 它不包含子项目。
一般情况下, 叶节点最终会完成大部分的实际工作, 因为它们无法将工作指派给其他部分。
容器 (Container)——又名 “组合 (Composite)”——是包含叶节点或其他容器等子项目的单位。 容器不知道其子项目所属的具体类, 它只通过通用的组件接口与其子项目交互。
容器接收到请求后会将工作分配给自己的子项目, 处理中间结果, 然后将最终结果返回给客户端。
1
2
3
4
5
6
7
8
9
10
11
12
13
14
15
16
17
18
19
20
21
22
23
24
25
26
27
28
29
30
31
32
33
34
35
36
37
38
39
40
41
42
43
44
45
46
47
48
49
50
51
52
53
54
55
56
57
58
59
	export class Implementation
	{
	public:
		virtual std::string Operation()
		{
			std::cout << "Implementation" << std::endl;
			return "Implementation";
		}
	};

	//具体实现
	class ConcreteImplementationA : public Implementation
	{
	public:
		std::string Operation() override
		{
			return "ConcreteImplementationA: Here's the result on the platform A.\n";
		}
	};
	class ConcreteImplementationB : public Implementation
	{
	public:
		std::string Operation() override
		{
			return "ConcreteImplementationB: Here's the result on the platform B.\n";
		}
	};

	//抽象层
	class Abstraction
	{
	protected:
		Implementation* imp;
	public:
		Abstraction(Implementation* implementation) :
			imp(implementation)
		{}
		virtual ~Abstraction()
		{
			delete imp;
		}
		virtual std::string Operation()
		{
			return imp->Operation();
		}
	};

	class ExtendedAbstraction : public Abstraction
	{
	public:
		ExtendedAbstraction(Implementation* implementation) :Abstraction(implementation)
		{

		}
		virtual std::string Operation() override
		{
			return "ExtendedAbstraction: " + imp->Operation();
		}
	};
观察者模式结构
- 发布者 (Publisher) 会向其他对象发送值得关注的事件。 事件会在发布者自身状态改变或执行特定行为后发生。 发布者中包含一个允许新订阅者加入和当前订阅者离开列表的订阅构架。
- 当新事件发生时, 发送者会遍历订阅列表并调用每个订阅者对象的通知方法。 该方法是在订阅者接口中声明的。
- 订阅者 (Subscriber) 接口声明了通知接口。 在绝大多数情况下, 该接口仅包含一个
update更新方法。 该方法可以拥有多个参数, 使发布者能在更新时传递事件的详细信息。 - 具体订阅者 (Concrete Subscribers) 可以执行一些操作来回应发布者的通知。 所有具体订阅者类都实现了同样的接口, 因此发布者不需要与具体类相耦合。
- 订阅者通常需要一些上下文信息来正确地处理更新。 因此, 发布者通常会将一些上下文数据作为通知方法的参数进行传递。 发布者也可将自身作为参数进行传递, 使订阅者直接获取所需的数据。
1
2
3
4
5
6
7
8
9
10
11
12
13
14
15
16
17
18
19
20
21
22
23
24
25
26
27
28
29
30
31
32
33
34
35
36
37
38
39
40
41
42
43
44
45
46
47
48
49
50
51
52
53
54
55
56
57
58
59
60
61
62
63
64
65
66
67
68
69
70
71
72
73
74
75
76
77
78
	export class IObserver
	{
	public:
		virtual ~IObserver() {}
		virtual void Update(std::string context)
		{
			std::cout << "IObserver::Update(" << context << ")" << std::endl;
		}
	};

	export class ISubject
	{
	public:
		virtual ~ISubject() {}
		virtual void Attach(IObserver* observer) = 0;
		virtual void Detach(IObserver* observer) = 0;
		virtual void Notify() = 0;
	};

	export class Subject : public ISubject
	{
		std::list<IObserver*> observers;
		std::string message;
	public:
		void Attach(IObserver* observer) override
		{
			observers.push_back(observer);
		}
		void Detach(IObserver* observer) override
		{
			observers.remove(observer);
		}
		void Notify() override
		{
			for (auto observer : observers)
			{
				observer->Update(message);
			}
		}
		void SetMessage(std::string message)
		{
			this->message = message;
		}

	};

	export class Observer : public IObserver
	{
		std::string messege;
		Subject* m_subject;
	public:
		Observer(Subject* subject)
		{
			m_subject = subject;
			m_subject->Attach(this);
		}
		~Observer()
		{
			m_subject->Detach(this);
		}

		void Update(std::string context) override
		{
			messege = context;
			Display();
		}

		void Display()
		{
			std::cout << "Observer::Display(" << messege << ")" << std::endl;
		}

		void Detech()
		{
			m_subject->Detach(this);
		}

	};
策略模式结构
- 上下文 (Context) 维护指向具体策略的引用, 且仅通过策略接口与该对象进行交流。
- 策略 (Strategy) 接口是所有具体策略的通用接口, 它声明了一个上下文用于执行策略的方法。
- 具体策略 (Concrete Strategies) 实现了上下文所用算法的各种不同变体。
- 当上下文需要运行算法时, 它会在其已连接的策略对象上调用执行方法。 上下文不清楚其所涉及的策略类型与算法的执行方式。
- 客户端 (Client) 会创建一个特定策略对象并将其传递给上下文。 上下文则会提供一个设置器以便客户端在运行时替换相关联的策略。
1
2
3
4
5
6
7
8
9
10
11
12
13
14
15
16
17
18
19
20
21
22
23
24
25
26
27
28
29
30
31
32
33
34
35
36
37
38
39
40
41
42
43
44
45
46
47
48
49
50
51
52
53
54
55
56
57
58
59
60
61
62
63
64
65
66
67
68
69
70
71
72
73
74
75
76
77
78
79
80
81
82
83
84
85
86
87
88
89
90
91
92
template <typename T>
	class Strategy
	{
	public:
		Strategy() = default;
		virtual ~Strategy() {};
		virtual std::vector<T> execute(const std::vector<T>& data) = 0;

	};

	template <typename T>
	class StrategyA :public Strategy<T>
	{
	public:
		StrategyA() = default;

		std::vector<T> execute(const std::vector<T>& data) override
		{
			std::vector<T> result;
			std::for_each(std::begin(data), std::end(data), [&result](const T& elem)
				{
					result.push_back(elem);
				});
			std::sort(std::begin(result), std::end(result));

			return std::move(result);
		}
	};
	template <typename T>
	class StrategyB : public Strategy<T>
	{
		public:
		StrategyB() = default;
		std::vector<T> execute(const std::vector<T>& data) override
		{
			std::vector<T> result;
			std::for_each(std::begin(data), std::end(data), [&result](const T& elem)
				{
					result.push_back(elem);
				});
			for (int i = 0; i < result.size() / 2; i++)
			{
				std::swap(result[i], result[result.size() - i - 1]);
			}
			return std::move(result);
		}
	};

	class Context
	{
		/**
		 * @var Strategy The Context maintains a reference to one of the Strategy
		 * objects. The Context does not know the concrete class of a strategy. It
		 * should work with all strategies via the Strategy interface.
		 */
	private:
		Strategy<int>* strategy_;
		/**
		 * Usually, the Context accepts a strategy through the constructor, but also
		 * provides a setter to change it at runtime.
		 */
	public:
		Context(Strategy<int>* strategy = nullptr) : strategy_(strategy)
		{
		}
		~Context()
		{
			delete this->strategy_;
		}
		/**
		 * Usually, the Context allows replacing a Strategy object at runtime.
		 */
		void SetStrategy(Strategy<int>* strategy)
		{
			delete this->strategy_;
			this->strategy_ = strategy;
		}
		/**
		 * The Context delegates some work to the Strategy object instead of
		 * implementing +multiple versions of the algorithm on its own.
		 */
		void ContextInterface() const
		{
			std::cout << "Context: Sorting data using the strategy (not sure how it'll do it)\n";
			std::vector<int> result = this->strategy_->execute(std::vector<int>{1,1,4,5,1,4});
			for(auto elem : result)
			{
				std::cout << elem << " ";
			}
			std::cout << std::endl;
		}
	};


